

Hair plopping is a drying technique for curly and wavy hair that enhances curl definition, reduces frizz, and eliminates the weight and damage of blow-drying. Despite the silly name, it’s one of the most effective methods for achieving salon-quality curls at home.
The concept is simple: instead of rubbing wet hair with a towel or letting it air dry with gravity pulling curls straight, you “plop” your hair into a microfiber towel or T-shirt in a way that supports the curl pattern while it dries. The result is bouncy, defined, frizz-free curls.
This guide covers the exact step-by-step technique, which materials work best, optimal timing, and the mistakes that ruin results.
Before learning plopping, understand your curl type using our complete hair type guide. Plopping works best for Type 2-3 hair. Type 4 hair benefits more from other techniques.
Quick Answer: Hair plopping is a drying method where you wrap wet, product-applied hair in a microfiber towel or cotton T-shirt to dry in its natural curl pattern. Best for Type 2-3 hair. Plop for 20-45 minutes, then air dry or diffuse. Reduces frizz, enhances definition, faster drying than air dry alone.
What Hair Plopping Actually Does
Hair plopping accomplishes three things simultaneously:
- Absorbs excess water gently: Microfiber or cotton absorbs moisture without the friction of towel-drying
- Supports curl pattern: Keeping curls on top of your head prevents gravity from stretching them straight
- Encourages curl clumping: The contained environment helps curls form defined spirals rather than separating into frizz
Research shows that minimizing mechanical manipulation during drying significantly reduces frizz formation in curly hair [International Journal of Cosmetic Science].
Who Should Use Hair Plopping
Best For
- Type 2 (Wavy hair): Creates more defined waves, adds volume at roots
- Type 3A-3B (Loose to medium curls): Maximum benefit — enhances spiral definition dramatically
- Anyone wanting to reduce drying time: Plopping removes 30-40% of water weight before air drying
Less Effective For
- Type 1 (Straight hair): No curl pattern to support
- Type 3C-4 (Tight curls/coils): These hair types need different techniques for moisture retention and definition. Plopping can cause excessive shrinkage.
- Very short hair: Not enough length to wrap effectively

Best Materials for Hair Plopping
The material you use significantly affects results. Here’s the comparison:
| Material | Pros | Cons | Best For |
|---|---|---|---|
| Microfiber towel | Absorbs water quickly, reduces frizz, lightweight | Can be too absorbent for some (dries hair too much) | Type 2-3A, shorter plop times (20-30 min) |
| Cotton T-shirt | Gentle, less absorbent, no frizz, free | Heavier when wet, takes longer | Type 3B-3C, longer plop times (30-45 min) |
| Regular towel | Available everywhere | Too rough, creates frizz, too absorbent | Not recommended for plopping |
| Silk/satin scarf | Smoothest, zero frizz | Doesn’t absorb water, hair stays too wet | Overnight plopping only (not for drying) |
Studies show microfiber creates significantly less friction than cotton terry cloth [Journal of Textile Science].
Recommendation: Start with a cotton T-shirt (free, gentle). If you plop regularly, invest in a microfiber hair towel designed for curls.
For more on fabric choice for hair health, see our silk vs satin pillowcases guide.
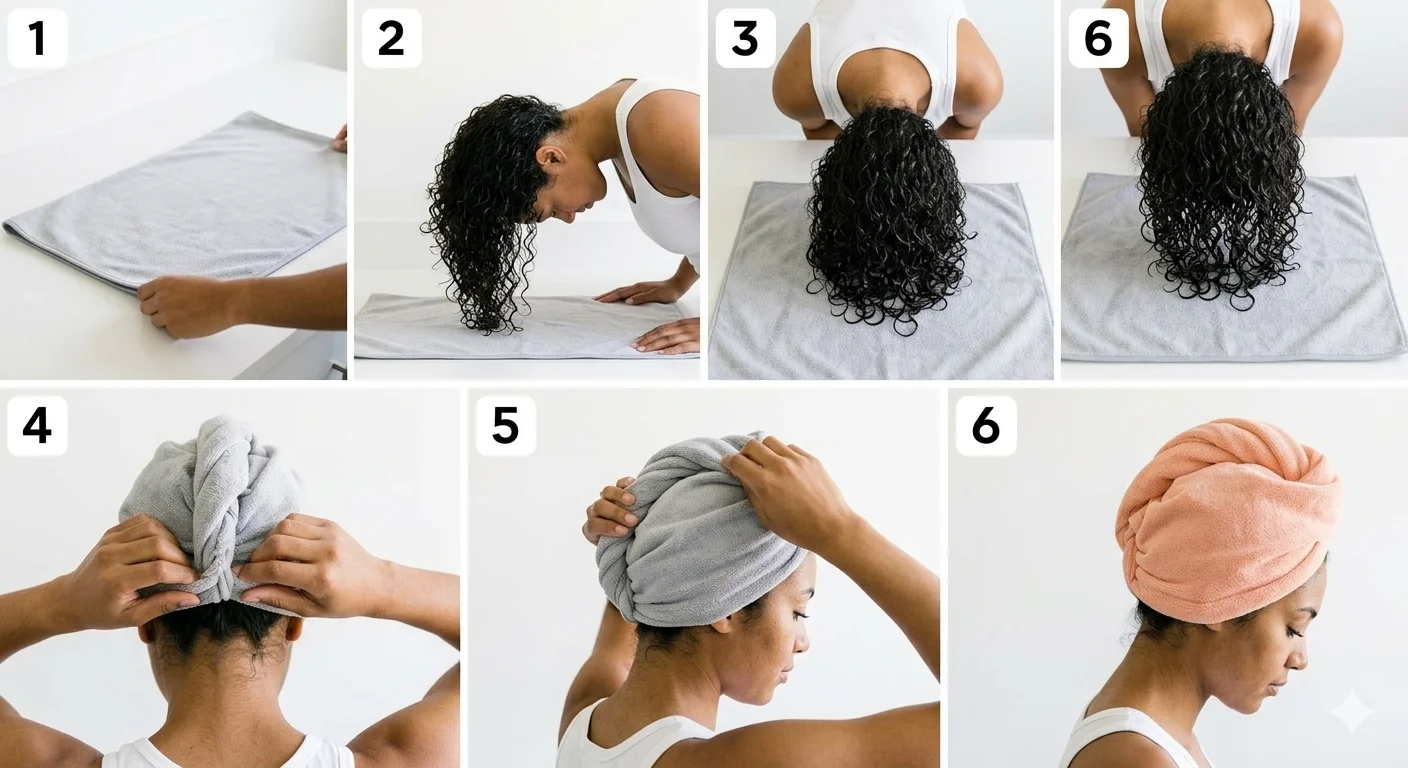
How to Plop Hair: Step-by-Step Method
Follow this exact process for best hair plopping results:
Preparation (In Shower)
- Wash and condition as normal
- Squeeze out excess water with hands (don’t wring or twist)
- Apply leave-in conditioner and/or curl cream while hair is soaking wet
- Scrunch products upward into curls
- Apply gel if using (for hold)
The Plopping Technique
- Prepare your surface: Lay microfiber towel or T-shirt flat on bathroom counter or bed. If using T-shirt, lay it with arms extended outward.
- Flip hair forward: Bend at waist and flip all hair forward so it hangs down toward the towel.
- Lower onto towel: Lower your head until all hair is piled on the center of the towel. Your hairline should be at the edge of the towel.
- Wrap sides: Take the sides of the towel and bring them together at the nape of your neck. The towel should now wrap around your head.
- Secure at front: Twist the long ends of the towel together, then bring them forward over your head and tie at your forehead or tuck securely.
- Adjust position: Stand up carefully. All your hair should be on top of your head in the towel, not hanging down.
Critical Points
- Don’t adjust or touch hair once it’s in the plop
- Keep your head upright — bending forward pulls curls straight
- Make sure the plop feels secure but not tight
How Long to Plop Hair
Timing is critical. Too short and hair is still too wet. Too long and curls dry in a compressed position creating flat roots.
| Hair Type | Plop Time | Notes |
|---|---|---|
| Type 2 (Wavy) | 10-20 minutes | Quick absorption, don’t over-plop or waves fall flat |
| Type 3A (Loose curls) | 20-30 minutes | Sweet spot for definition without flatness |
| Type 3B (Medium curls) | 30-45 minutes | Can plop longer, hair retains more water |
| Fine hair | 10-15 minutes maximum | Longer causes flat roots and loss of volume |
| Thick/coarse hair | 30-45 minutes or overnight | Holds more water, benefits from longer plopping |
After Plopping
Once you remove the plop:
- Don’t touch hair: Resist the urge to scrunch or adjust. This creates frizz.
- Air dry: Let hair finish drying naturally, or
- Diffuse: Use a blow dryer with diffuser attachment on low heat
- Scrunch out the crunch: Once hair is 100% dry, gently scrunch to break any gel cast
Overnight Hair Plopping
Some people plop overnight for maximum convenience. This works but has trade-offs:
Pros
- Wake up with nearly dry hair
- Maximum curl enhancement
- No morning styling needed
Cons
- Can create flat spots where you sleep on the plop
- Roots may be flat from compressed position all night
- Only works for people who can sleep with wrapped head
How to Overnight Plop Successfully
- Use a cotton T-shirt (more comfortable than microfiber for sleeping)
- Secure plop very well so it doesn’t come loose
- Sleep on satin pillowcase to reduce friction if plop shifts
- Expect to lose some root volume — trade-off for convenience
Common Hair Plopping Mistakes
Mistake #1: Using a Regular Towel
Terry cloth towels are too rough and absorbent. They create frizz and suck out too much moisture. Always use microfiber or T-shirt.
Mistake #2: Plopping on Dry or Damp Hair
Hair plopping only works on soaking wet hair with products already applied. If hair is too dry when you plop, you’re just compressing it, not supporting curl formation.
Mistake #3: Plopping Too Long
More than 45 minutes flattens roots on most hair types. Fine hair should never plop longer than 20 minutes.
Mistake #4: Touching Hair During or Immediately After
Every time you touch plopped hair, you disrupt curl formation and create frizz. Plop it and leave it alone.
Mistake #5: Not Securing the Plop Properly
If the plop comes loose, hair falls down and you lose all benefits. Make sure it’s tied or tucked very securely.
Mistake #6: Skipping Products Before Plopping
Plopping without leave-in conditioner and curl cream means you’re just drying hair in a towel. Products provide the slip and hold that create defined curls.
For product recommendations for curly hair, see our best hair products guide.

Troubleshooting Hair Plopping Problems
Problem: Flat Roots
Cause: Plopping too long or using too tight a wrap
Fix: Reduce plop time by 10-15 minutes. Ensure wrap is snug but not tight. Clip roots after removing plop to add lift while air drying.
Problem: Frizzy Results
Cause: Touching hair during/after plopping, or using regular towel
Fix: Switch to microfiber or T-shirt. Don’t touch hair until completely dry.
Problem: Curls Not Defined
Cause: Not enough product applied before plopping, or hair too dry when plopping
Fix: Apply products to soaking wet hair. Use more gel for hold.
Problem: Takes Too Long to Dry After
Cause: Thick hair retaining water, or using T-shirt instead of microfiber
Fix: Switch to microfiber towel for faster absorption. Diffuse on low heat after plopping.
Problem: Plop Won’t Stay Secure
Cause: Hair too heavy, or towel too small
Fix: Use larger microfiber towel. Secure with hair tie or clips in addition to tucking.
Hair Plopping Variations
Micro-Plopping
Instead of wrapping entire head, gently scrunch sections with microfiber towel to remove water while enhancing curls. Good for people who find traditional plopping uncomfortable.
Plop + Diffuse
Plop for 20 minutes, then diffuse remaining moisture. Gives definition of plopping with faster dry time.
Product Refresh Plop
For day 2-3 hair, lightly wet with spray bottle, apply refresher products, plop for 10-15 minutes to revive curls.
For more curl enhancement techniques, see our guide on how to detangle hair without breakage which covers proper curl handling.
What to Expect
First time: Results may be underwhelming as you learn technique. Curls might be oddly shaped or plop may not stay secure.
Week 2-3: As you dial in your timing and technique, curl definition improves noticeably. Frizz decreases.
Month 2+: Plopping becomes part of your routine. Consistent technique produces consistent, defined curls with minimal frizz.
Best results: When combined with proper products, correct timing for your hair type, and minimal manipulation.
Final Thoughts
Hair plopping is a simple technique that produces dramatic improvements in curl definition and frizz reduction. It costs nothing (use an old T-shirt), takes 20-45 minutes, and works with your existing routine.
The key is using the right material (microfiber or T-shirt), plopping on soaking wet product-applied hair, timing it correctly for your hair type, and not touching hair during the process.
Try it for 2 weeks before deciding if it works for you. Most people with Type 2-3 hair see immediate improvement. Adjust timing and technique based on your results.
