Here’s the hard truth about heat damage repair: you cannot reverse structural damage to hair that’s already been fried. The protein bonds in those strands are permanently broken. But — and this is important — you can significantly improve the appearance and prevent further damage while waiting for healthy new growth.
This guide gives you the 6 steps that actually work for heat damage repair, based on real hair science. It also covers what doesn’t work despite marketing claims, and realistic timelines for seeing improvement.
If you’re still using heat tools, read our best hair tools guide first to learn safe temperature ranges and proper heat protectant use. Prevention is always easier than repair.
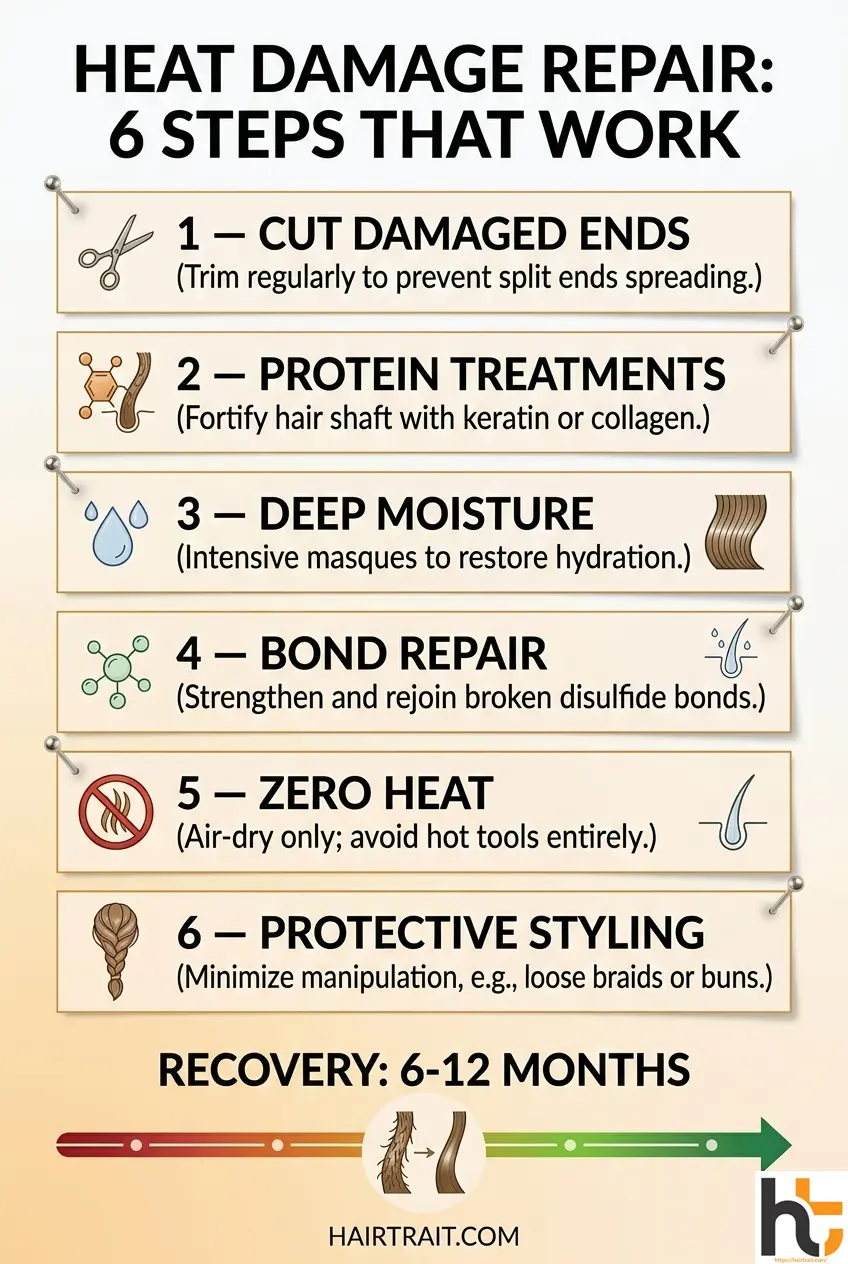
Quick Answer: Heat damage repair requires 6 steps: (1) Cut damaged ends, (2) Protein treatments to fill gaps, (3) Deep moisture conditioning, (4) Bond repair treatments, (5) Eliminate all heat styling, (6) Protective styling. Full recovery takes 6-12 months as you grow out damage. Surface improvement happens in 4-8 weeks.
Table of Contents
What Heat Actually Does to Your Hair (The Science)
Heat above 230°C (450°F) causes permanent structural changes to the keratin protein in hair. Research shows that high heat degrades disulfide bonds — the bridges that give hair its shape and strength [Journal of Cosmetic Science].
When these bonds break, hair loses elasticity. It becomes brittle, prone to breakage, and unable to hold moisture. The outer protective layer lifts and peels away, creating the rough, frizzy texture of heat-damaged hair.
Additionally, heat vaporizes the water inside the hair shaft. This creates tiny bubbles of steam that push outward from the inside. You can sometimes see these as white beads along the strand. That’s internal structural damage.
Heat damage repair can’t rebuild broken bonds. But it can fill the gaps temporarily, smooth the outer layer, and create the conditions for healthier new growth.
Assess Your Damage Level First
Before starting heat damage repair, identify how severe your damage is. This determines which steps you need and realistic expectations.
| Damage Level | Signs | Recovery Time |
|---|---|---|
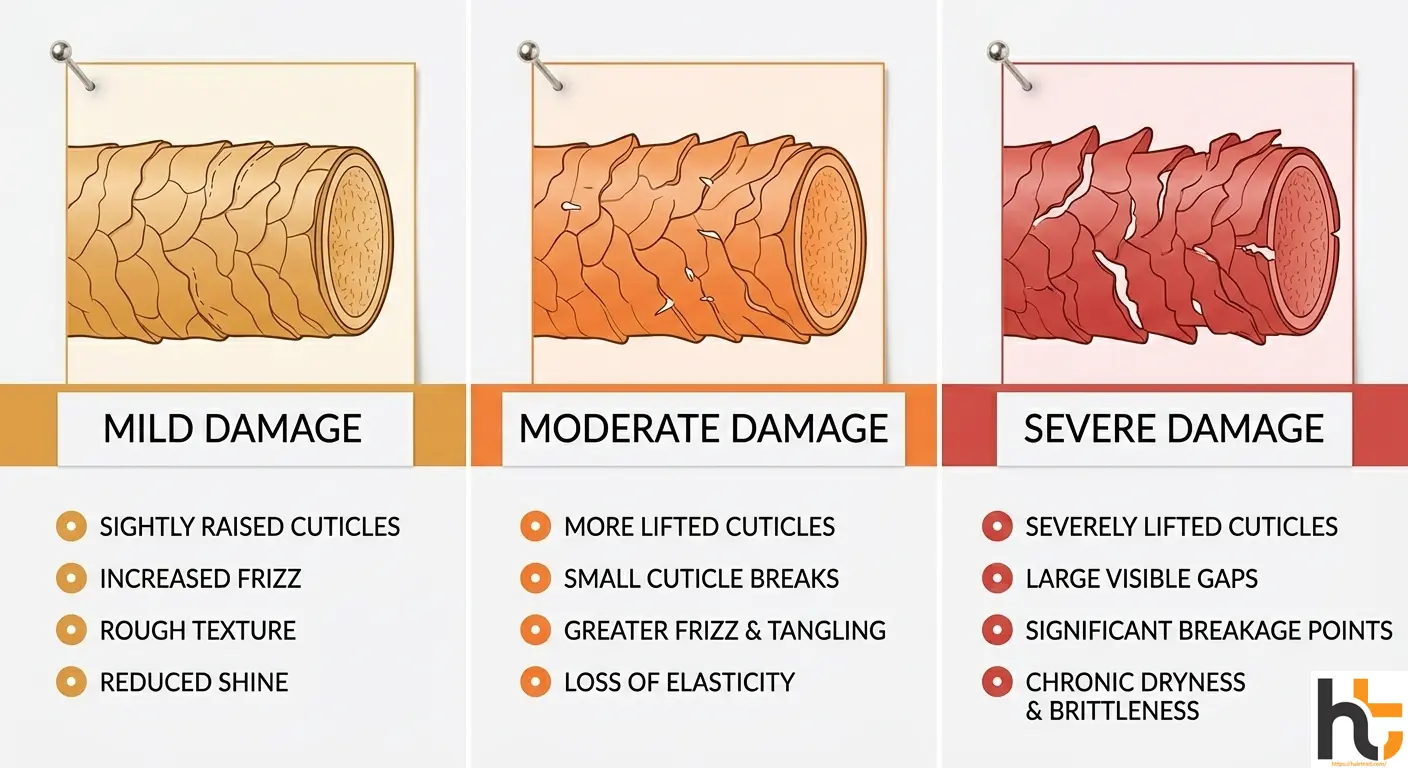
| Mild | Slight dryness, minimal split ends, hair still has elasticity | 4-6 weeks |
| Moderate | Noticeable dryness, many split ends, tangles easily, some breakage | 8-12 weeks |
| Severe | Extreme dryness, constant breakage, gummy when wet, hair snaps easily, white beads visible on strands | 6-12 months (requires cutting and growing out) |
Step 1: Cut the Damaged Ends (Non-Negotiable)
This is the step people skip, hoping treatments will magically repair what’s broken. They won’t. Severely damaged ends — the ones with visible white beads, that feel like straw, or break when you touch them — cannot be saved.
Why It’s Critical
Split ends travel upward along the strand. A 1cm split end becomes a 3cm split end within weeks if left uncut. Studies confirm that mechanical damage propagates along the hair shaft [International Journal of Trichology].
Additionally, damaged ends tangle with healthy hair and cause breakage higher up the strand during detangling.
How Much to Cut
- Mild damage: 1-2cm trim to remove split ends
- Moderate damage: 3-5cm to remove the worst damage
- Severe damage: Cut to where hair feels healthy. This might mean cutting 10-15cm or more. Yes, it’s drastic. But keeping severely damaged hair prolongs recovery and causes more breakage overall.
Mindset shift: You’re not losing length. You’re establishing a healthy baseline to build from. Damaged hair that constantly breaks never gets longer anyway.
Step 2: Protein Treatments to Fill Structural Gaps
Heat damage creates gaps in the hair’s protein structure. Protein treatments temporarily fill these gaps and restore some strength and elasticity.
What to Use
Look for hydrolyzed proteins in the first 5 ingredients:
- Hydrolyzed keratin: Most similar to hair’s natural protein. Best for severe damage.
- Hydrolyzed wheat protein: Smaller molecules, penetrates well. Good for fine hair.
- Hydrolyzed silk protein: Adds shine and smoothness. Best for moderate damage.
How to Use
- Apply protein treatment to clean, damp hair
- Focus on mid-lengths and ends (not scalp)
- Leave on for time recommended (usually 15-30 minutes)
- Use heat (steamer or hooded dryer) for better penetration
- Rinse thoroughly
- Always follow with a moisturizing conditioner
Frequency
- Severe damage: Weekly for first month, then bi-weekly
- Moderate damage: Bi-weekly
- Mild damage: Monthly
For balancing protein with moisture, see our guide on protein vs moisture balance.
Step 3: Deep Moisture Conditioning (Alternate with Protein)
Protein provides structure. Moisture provides flexibility. Heat-damaged hair needs both in careful balance for effective heat damage repair.
What to Use
Look for:
- Humectants (glycerin, honey, aloe vera, panthenol) to attract moisture
- Emollients (shea butter, coconut oil, argan oil) to seal it in
- Ceramides or cholesterol to repair outer layer gaps
The Alternating Schedule
| Week | Treatment |
|---|---|
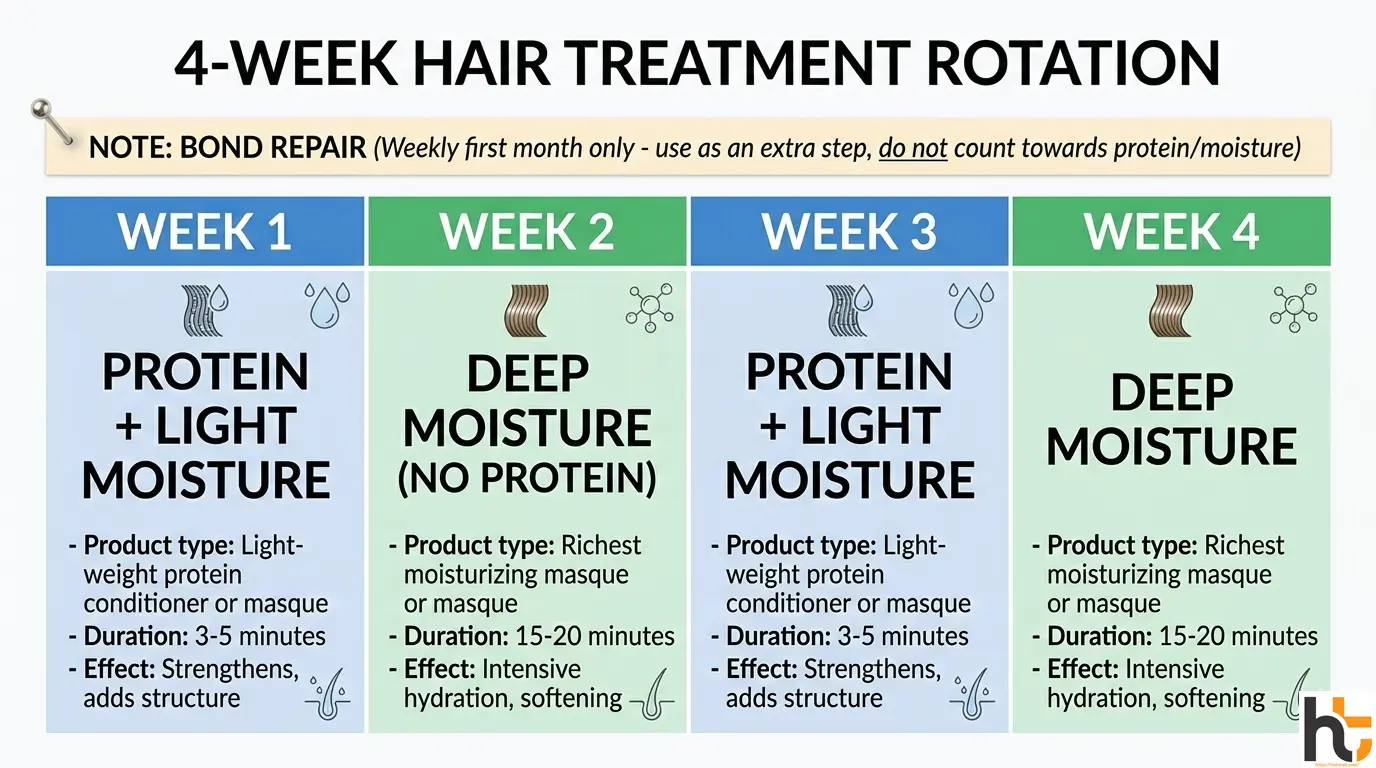
| Week 1 | Protein treatment + light moisture conditioner |
| Week 2 | Deep moisture conditioning (protein-free) with heat for 30 min |
| Week 3 | Protein treatment + light moisture conditioner |
| Week 4 | Deep moisture conditioning (protein-free) |
This alternation prevents both protein overload and moisture overload while addressing both needs.
Step 4: Bond Repair Treatments (Advanced Option)
Bond repair treatments (like Olaplex, K18, or similar) work differently than protein. They attempt to rebuild some of the broken disulfide bonds rather than just filling gaps.
How They Work
These products contain molecules that can link broken sulfur bonds and partially restore hair’s internal structure. Research shows some bond repair ingredients can measurably improve tensile strength in chemically damaged hair [NCBI].
Realistic Expectations
Bond repair treatments improve hair structure. They don’t fully restore it to virgin condition. Expect:
- Improved elasticity (hair stretches without snapping)
- Reduced breakage during styling
- Better moisture retention
- Smoother texture
They work best on moderate damage. Severely fried hair is beyond repair even with bond treatments.
How to Use
Follow product-specific instructions exactly. Most work best:
- On freshly washed, towel-dried hair
- Applied to lengths and ends, not scalp
- Left on for specified time (varies by product: 4-10 minutes)
- Some rinse out, some stay in
Use weekly for first month, then every 2 weeks for maintenance.
Step 5: Eliminate All Heat Styling (The Hardest Step)
You cannot repair heat damage while continuing to cause it. Zero heat means zero heat. Not “just low heat.” Not “once a week.” Zero.
Why This Is Non-Negotiable
Even “low” heat (150-180°C) on already-damaged hair causes cumulative damage. The repair treatments you’re doing won’t keep pace with ongoing heat exposure.
Alternative Styling Methods
- Air drying: Use microfiber towel, apply leave-in, let dry naturally
- Heatless curls: Flexi rods, foam rollers, sock curls, braiding
- Protective styles: Braids, buns, twists that minimize manipulation
For tool recommendations and heatless styling options, see our best hair tools guide.
Timeline
Commit to no heat for at least 3 months during intensive repair. After that, if you must use heat:
- Maximum 160°C temperature
- Only on special occasions (once monthly maximum)
- Always with heat protectant on completely dry hair
- Never on the same section twice
Step 6: Protective Styling to Minimize Mechanical Damage
While heat causes chemical damage, daily manipulation causes mechanical damage. Brushing, combing, and friction from clothing all stress weakened hair.
Best Protective Styles for Repair
- Low manipulation updos: Buns, chignons (secured with silk scrunchies, not elastics)
- Braids: Loose braiding reduces friction
- Twists: For textured hair, two-strand or three-strand twists
Critical Rules
- Never style hair while wet (weakest state)
- Use wide-tooth comb only, on conditioned hair
- Sleep on satin or silk pillowcase
- Minimize touching and playing with hair during the day
If you’re dealing with oiling as part of your repair routine, avoid the mistakes in our hair oiling mistakes guide.
What DOESN’T Work for Heat Damage Repair (Despite Marketing Claims)
Save your money. These don’t repair structural heat damage:
Myth #1: Hair Masks with “Repair” on the Label
Most drugstore “repair” masks are just moisturizing conditioners. They make hair feel better temporarily. They don’t rebuild broken bonds. Read ingredients. If there’s no hydrolyzed protein or bond repair active, it’s just conditioner.
Myth #2: Silicone Serums
Silicones (dimethicone, cyclomethicone) coat hair and create temporary smoothness. They hide damage. They don’t repair it. Hair underneath is still broken.
Myth #3: Natural Oils Alone
Coconut oil, argan oil, olive oil — all beneficial for healthy hair. None repair broken protein bonds. They add shine and moisture. That’s valuable. But it’s not structural repair.
Myth #4: Leave-In Sprays Claiming Instant Repair
If it works instantly, it’s coating damage, not repairing it. Real heat damage repair takes weeks of consistent treatment.
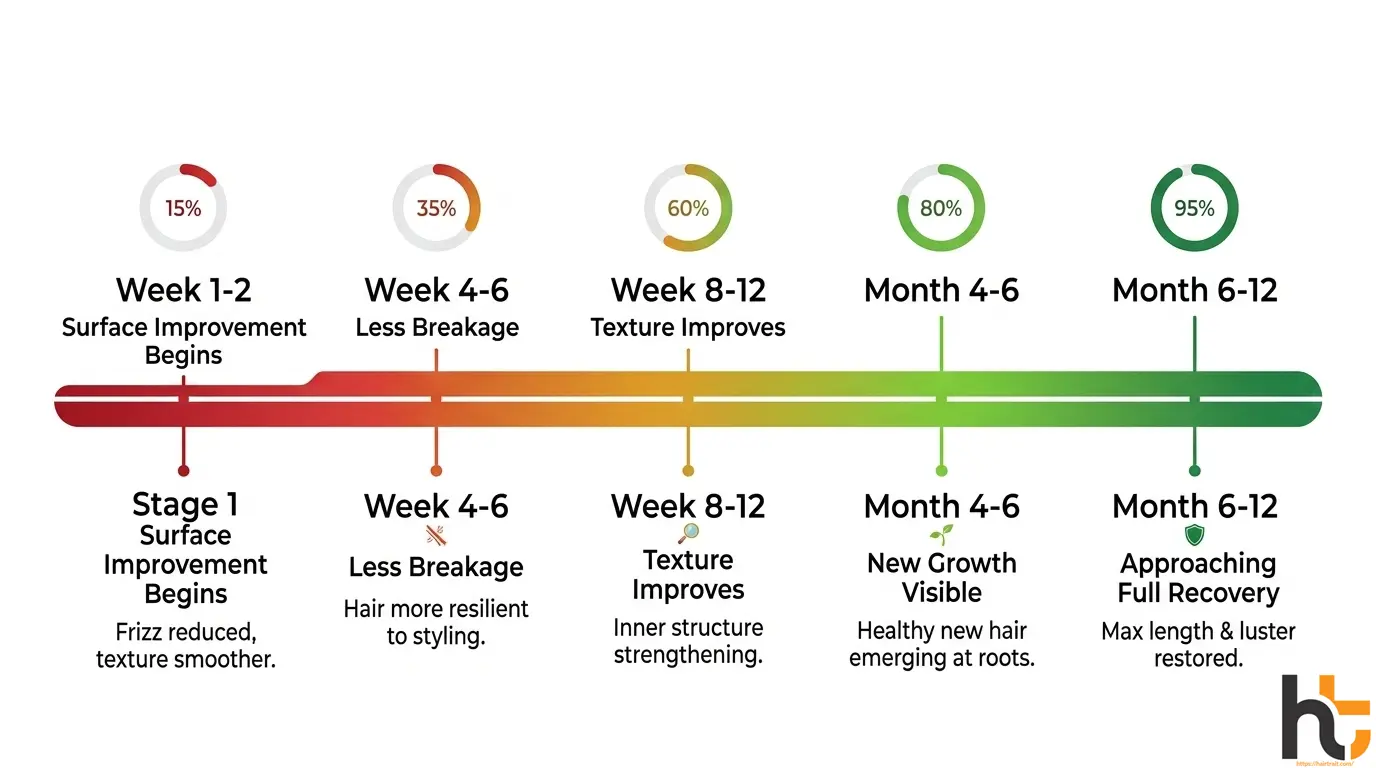
Realistic Timeline: What to Expect and When
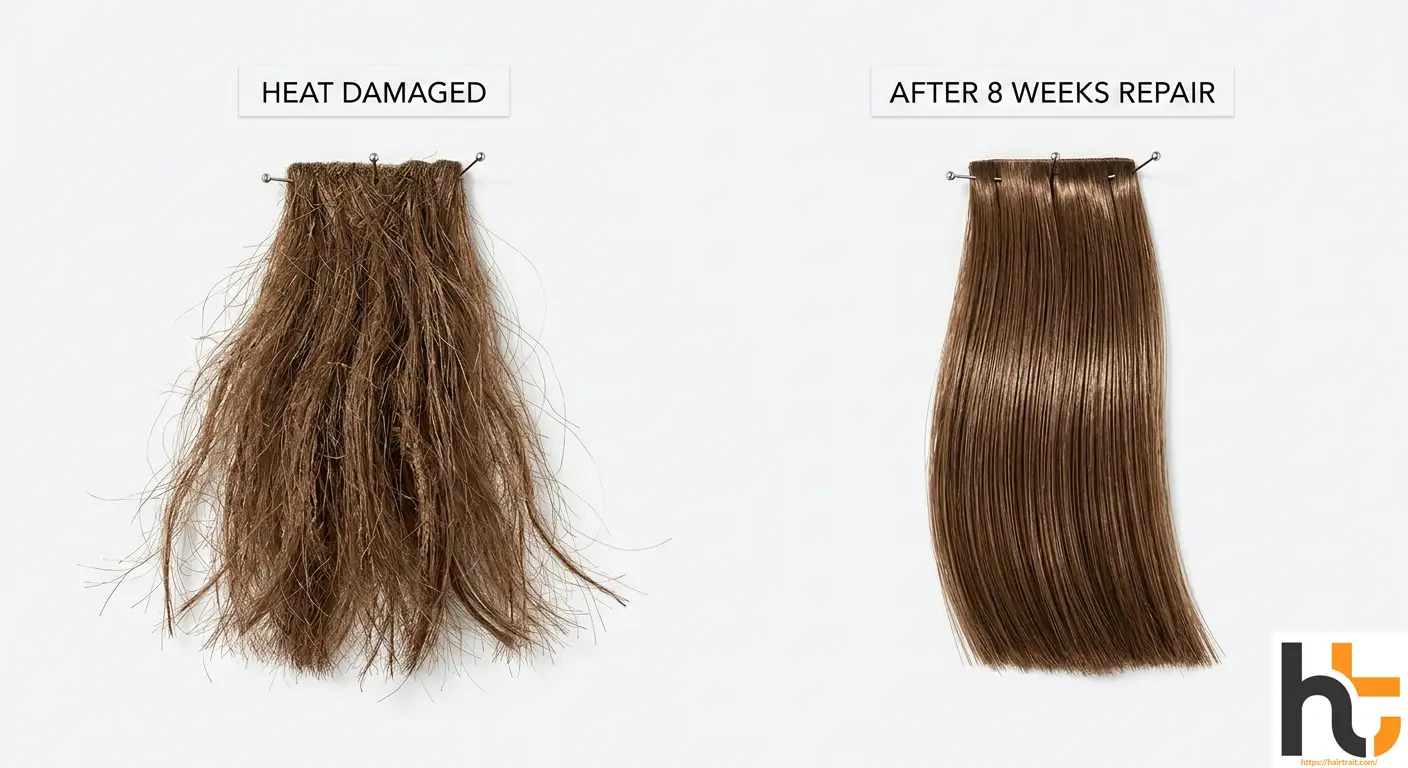
Week 1-2: Hair feels softer after treatments but still shows damage. This is normal. Surface improvement comes first.
Week 4-6: Noticeable reduction in breakage. Hair tangles less. Ends feel smoother. Some elasticity returns.
Week 8-12: Overall texture improves. Hair holds styles better. Shine increases. Breakage during detangling significantly reduced.
Month 4-6: You’re seeing 2-3cm of new, healthy growth at the roots. Damaged ends are either cut or pushed further down the strand. Hair overall looks and behaves much better.
Month 6-12: Depending on initial damage severity and how much you cut, you’re approaching full recovery. Most damaged hair has been cut away and replaced with healthy growth.
Critical note: Hair grows about 1.25cm per month. If you had 20cm of heat damage, full recovery means waiting for 20cm of new growth. That’s 16 months. There’s no way around it.
For complete product recommendations during recovery, see our best hair products guide.
Final Thoughts
Heat damage repair is a long game. It requires cutting what’s beyond saving, treating what can be improved, and protecting new growth from the same mistakes. The 6 steps in this guide — cutting damaged ends, alternating protein and moisture, using bond repair, eliminating heat, and protective styling — create the best possible environment for recovery.
But here’s the truth: the fastest way to healthy hair after heat damage is cutting it off and starting fresh. Everything else is managing damage while you wait for new growth. That’s not pessimism. That’s realistic expectation-setting.
Commit to the process. Be patient. And learn from it. Your hair will recover. Just not overnight.