Every heat styling guide tells you to “always use a heat protectant” — but rarely explains why or how they work. Do they genuinely shield your hair from damage, or are they another marketing-driven step in an increasingly complex routine? It’s a fair question, and the answer matters because heat styling is one of the most common causes of cumulative hair damage.
A good heat protectant is the single most impactful product you can use before picking up a flat iron, curling iron, or blow dryer. But not all heat protectants are created equal, and how you apply them is just as important as which one you choose. This article breaks down the science, identifies the ingredients that actually work, and shows you the correct application technique most people get wrong.
Quick Answer: Yes, heat protectants work — when formulated with effective ingredients and applied correctly. They form a thermal barrier (usually silicone-based) that distributes heat more evenly, reduces moisture loss, and prevents direct contact between the hot tool and your cuticle. Studies show they can reduce protein loss and cuticle damage by 50% or more. However, they reduce damage — they don’t eliminate it. No heat protectant makes heat styling “safe.” It makes it significantly less destructive.
Table of Contents
What Heat Actually Does to Your Hair
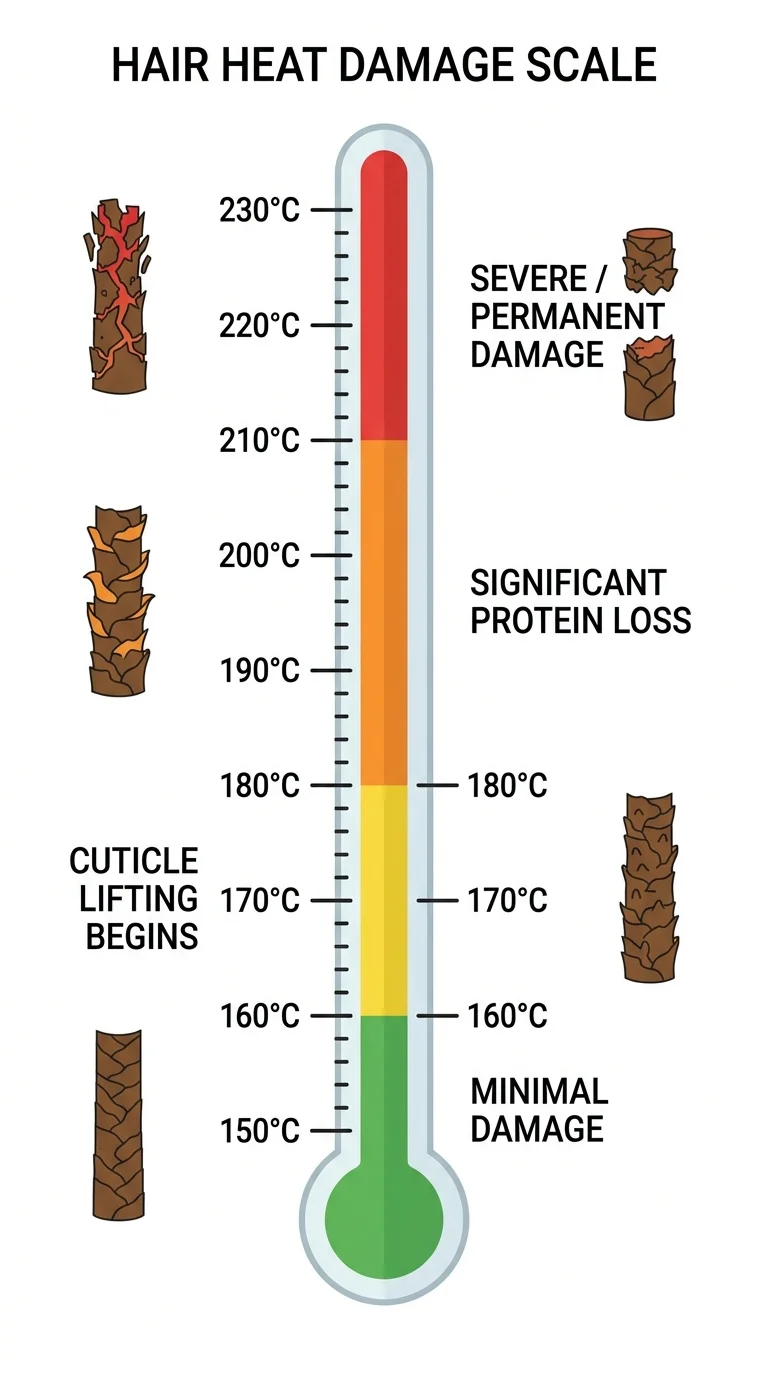
To understand why a heat protectant matters, you need to understand what heat does to hair at a structural level. Research published in the Journal of Cosmetic Science has documented the progression of heat damage at increasing temperatures:
| Temperature | What Happens |
|---|---|
| Up to 150°C (300°F) | Water evaporation from the cortex. Temporary shape change. Minimal permanent damage if occasional. |
| 150–180°C (300–356°F) | Cuticle begins to lift and crack. Protein denaturation starts. Noticeable over time with repeated use. |
| 180–210°C (356–410°F) | Significant protein denaturation. Internal keratin bonds break. Color fades. Moisture loss accelerates. This is where most flat irons operate. |
| Above 210°C (410°F) | Severe structural damage. Hair becomes brittle, loses elasticity permanently. “Bubble hair” formation possible — actual steam blisters inside the shaft. |
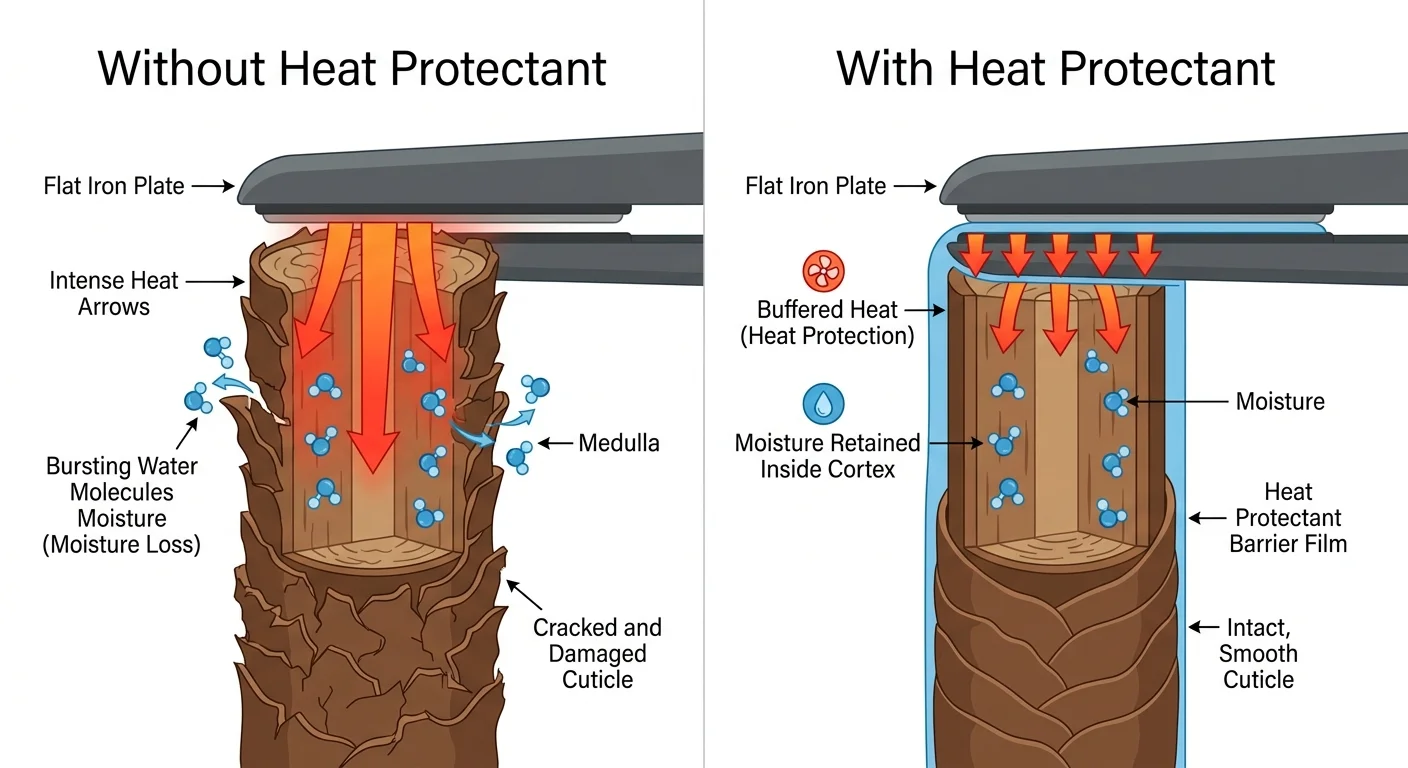
The core problem: when a hot tool touches hair, it superheats the water trapped inside the cortex. That water expands rapidly, creating internal pressure that cracks the cuticle from the inside out. Simultaneously, the high temperature denatures (permanently reshapes) keratin proteins, which is what creates the “straightened” or “curled” effect — but also progressively weakens the hair with each pass. For more on how structural damage accumulates, see our hair care basics guide.
How Heat Protectants Work
A heat protectant creates a temporary barrier between the hot tool and your hair’s cuticle. The mechanism varies by ingredient, but the most effective heat protectants do three things:
- Form a thermal shield. Film-forming ingredients (primarily silicones) coat the hair surface and distribute heat more evenly. Instead of one concentrated hot spot where the iron plate touches, heat spreads across the coated surface — reducing peak temperature at any single point on the cuticle.
- Slow moisture evaporation. The protective film slows how quickly water escapes from the cortex during heat exposure. This is critical because rapid steam formation is the primary cause of internal structural damage.
- Provide sacrificial protection. Some ingredients absorb heat energy themselves before it reaches the hair. Certain polymers and proteins in the formula essentially “take the hit” — they denature or evaporate instead of your hair’s keratin.
Studies using thermal gravimetric analysis (measuring weight loss from heat exposure) consistently show that hair treated with a heat protectant loses significantly less protein and moisture compared to unprotected hair at the same temperature and exposure duration.
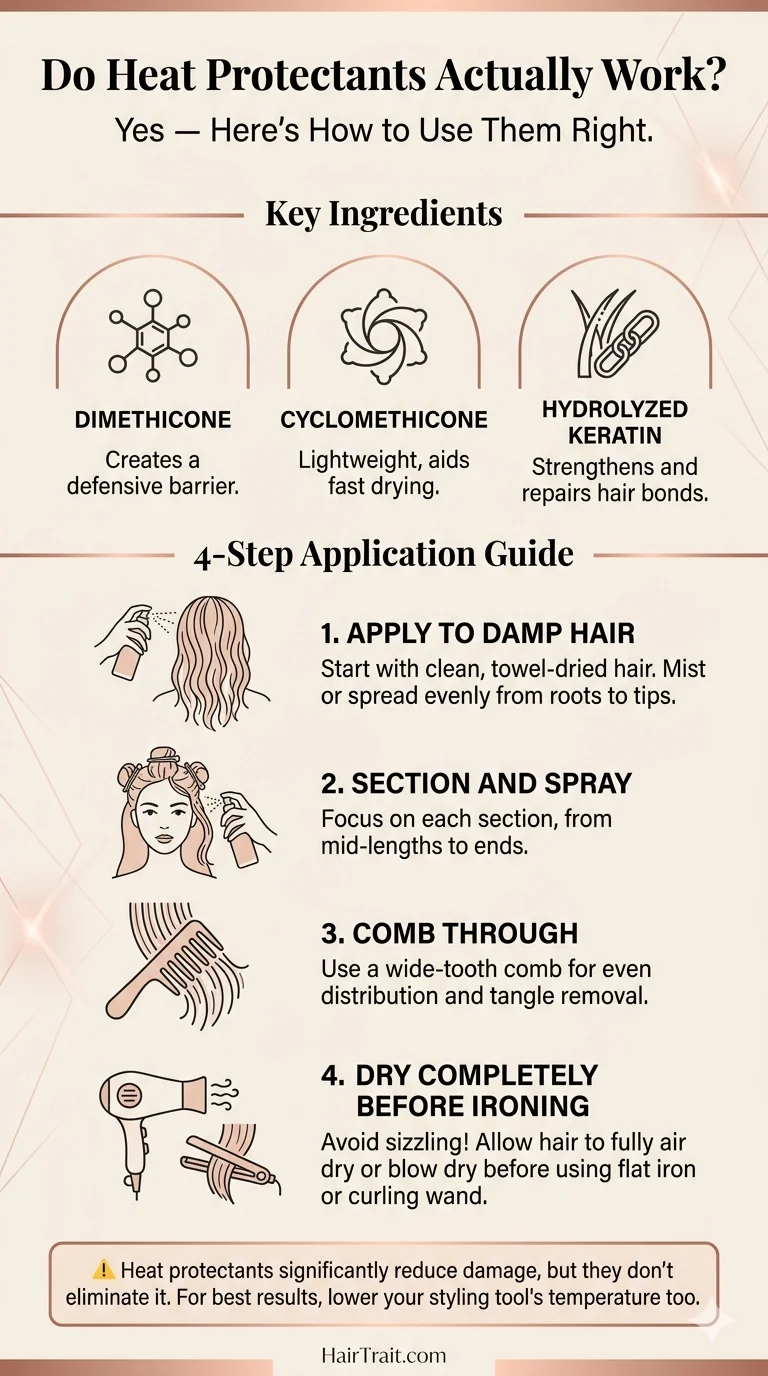
Key Ingredients That Actually Protect Against Heat
Not every product labeled “heat protectant” contains effective thermal protection ingredients. Here’s what the research supports:
| Ingredient | How It Works | Effectiveness |
|---|---|---|
| Dimethicone | Forms a smooth, even silicone film that distributes heat uniformly and reduces friction | High — most studied and most effective single ingredient for heat protection |
| Cyclomethicone / Cyclopentasiloxane | Lightweight volatile silicone that evaporates slowly, providing temporary heat buffering | Moderate-high — good for fine hair that can’t tolerate heavy silicones |
| PVP/VA Copolymer | Film-forming polymer that creates a heat-resistant barrier and adds hold | Moderate — commonly found in spray formulations |
| Hydrolyzed keratin / wheat protein | Temporarily fills cuticle gaps and provides “sacrificial” protein that denatures before your own keratin | Moderate — best combined with silicone-based ingredients |
| Quaternium-70 | Cationic conditioning agent that bonds to hair surface and provides thermal buffering | Moderate — often found in professional formulas |
The takeaway: if your heat protectant doesn’t contain at least one silicone (dimethicone, cyclomethicone, amodimethicone, or similar), it likely provides minimal actual heat protection. Natural oils alone — including argan oil and coconut oil — offer some lubrication but don’t create the thermal barrier that silicones do. For product selection help, check our best hair products guide.
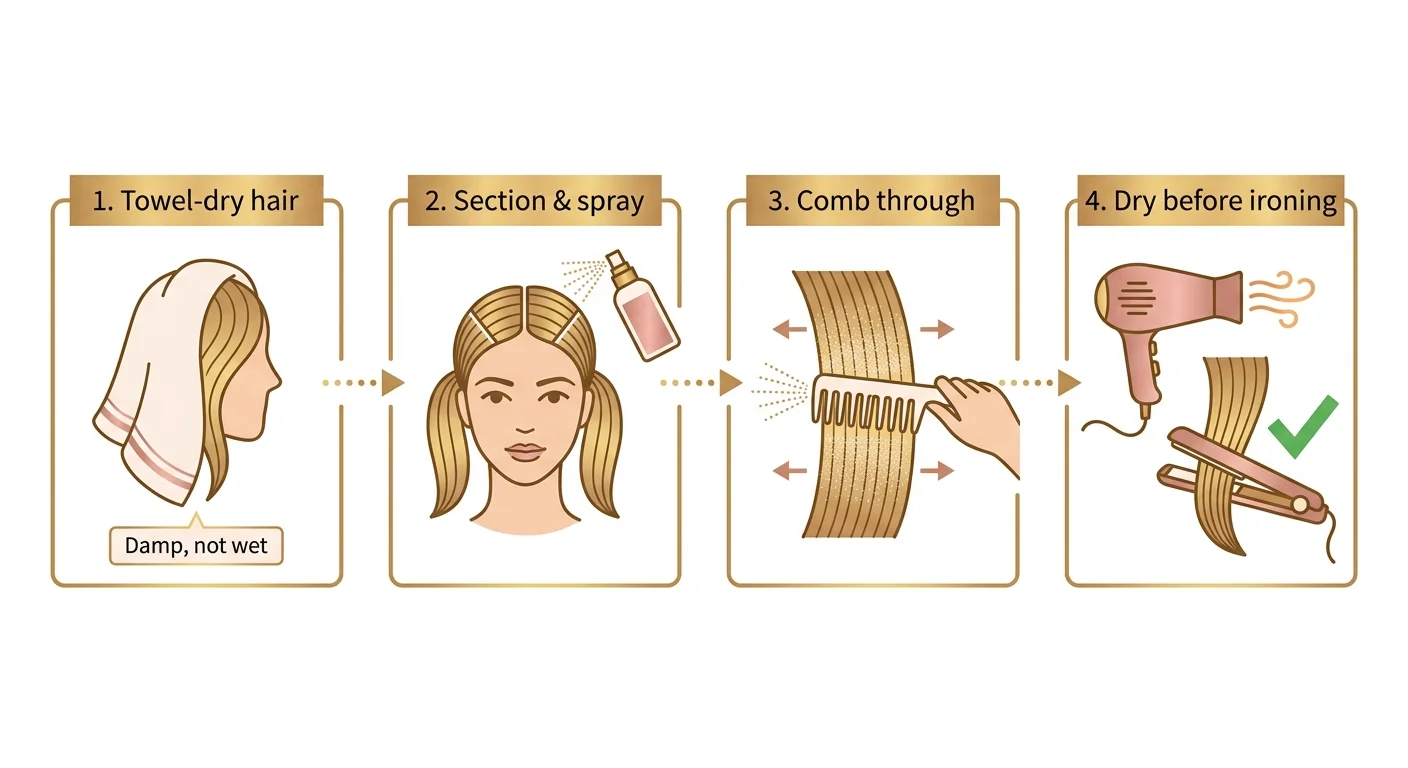
How to Apply a Heat Protectant Correctly
The application technique matters as much as the product itself. Most people apply heat protectants incorrectly, which dramatically reduces their effectiveness.
- Start with damp (not wet, not dry) hair. Heat protectants distribute most evenly on towel-dried, slightly damp hair. Applying to soaking wet hair over-dilutes the product. Applying to bone-dry hair creates uneven coverage with product concentrated in patches.
- Section your hair. Divide hair into 4–6 sections. Spray or apply the protectant to each section individually — front, sides, back, and crown. Most people spray the surface only, leaving the inner layers completely unprotected.
- Use enough product. A light mist is not sufficient. For spray formulas, apply 6–10 sprays total across all sections for medium-length hair. For cream or serum formulas, use a dime-to-nickel-sized amount. The goal is full, even coverage — not minimal application.
- Comb through. After applying, use a wide-tooth comb or detangling brush to distribute the product evenly from roots to ends. This ensures no section is left exposed.
- Let it dry before heat styling. Wait until the protectant is fully dry (or blow-dry on low heat first) before using a flat iron or curling iron. Applying a 200°C iron to wet protectant creates steam — the very thing you’re trying to avoid.
Heat Protectant Types: Which Format Is Best?
| Format | Best For | Pros | Cons |
|---|---|---|---|
| Spray | Fine-to-medium hair; everyday use | Lightweight, easy to distribute evenly, no residue | May need more product for thick/coarse hair; easier to under-apply |
| Cream / lotion | Thick, coarse, or very dry hair | Heavier protection, adds moisture, good for high-heat styling | Can weigh down fine hair; harder to distribute evenly |
| Serum / oil | Frizz-prone or high-porosity hair | Adds shine, smooths cuticle, doubles as finishing product | Can feel greasy if over-applied; may not provide as strong a thermal barrier alone |
| Leave-in conditioner with heat protection | Multi-step routine simplifiers | Combines conditioning + protection in one step | May compromise on protection strength; check for silicone content |
Match your hair type to the right format. Fine hair does best with sprays; thick, coarse hair benefits from creams. If in doubt, sprays are the most versatile and hardest to over-apply.
Common Mistakes With Heat Protectants
- Applying to bone-dry hair right before ironing. The product can’t distribute evenly on dry hair and doesn’t have time to form a proper film. Apply to damp hair, comb through, and let it dry first.
- Only spraying the top layer. If you spray once over the surface, only the outermost strands get protection. The underlayers — which get just as much heat exposure during styling — are completely exposed. Section and spray each layer individually.
- Using a “natural” protectant without silicones. Products marketed as silicone-free heat protectants typically rely on oils or light polymers that don’t create a meaningful thermal barrier. If serious heat protection is the goal, silicone-based formulas are significantly more effective.
- Thinking a heat protectant eliminates damage. Even the best heat protectant only reduces damage — it doesn’t prevent it entirely. Lowering your tool temperature (aim for 150–180°C for most hair types) and reducing the number of passes over each section are equally important. See our best tools guide for adjustable-temperature tool recommendations.
- Skipping heat protectant for blow-drying. Many people only use protectant before flat ironing or curling but skip it for blow-drying. A blow dryer at high heat (especially with a concentrator nozzle) can reach temperatures that cause cuticle damage. Always protect before any heat tool — including your dryer.
What to Expect When Using a Heat Protectant Consistently
| Timeframe | What Changes |
|---|---|
| Immediately | Hair feels smoother and more manageable after styling. Less static and flyaways. The iron glides more easily with reduced friction. |
| Week 2–4 | Reduced breakage during brushing and styling. Hair retains softness and elasticity better between washes. |
| Month 1–3 | Noticeably less split-end development. Hair color retains vibrancy longer (less heat-accelerated fading). Ends feel healthier and stronger. |
| Month 6+ | Cumulative difference becomes visible — your hair simply looks and feels healthier than it did before consistent protectant use, even with regular heat styling. |
The benefit of heat protectant is cumulative and preventive — you won’t see a dramatic overnight transformation, but over months, the difference between protected and unprotected heat styling becomes obvious. Pair your protectant use with seasonal adjustments from our seasonal hair care guide for the best long-term results.
Final Thoughts: Heat Protectant Is Non-Negotiable
If you use any heat tool on your hair — flat iron, curling iron, or blow dryer — a heat protectant is not optional. The science is clear: properly formulated heat protectants with silicone-based ingredients significantly reduce protein loss, moisture evaporation, and cuticle damage from thermal styling.
But a heat protectant is not a magic shield. It reduces damage, not eliminates it. The most effective approach combines a quality heat protectant with the lowest effective temperature for your hair type, minimal passes per section, and regular deep conditioning to repair what heat exposure inevitably takes. Use your heat protectant correctly — damp hair, full coverage, combed through, dried before ironing — and it becomes the most protective single product in your styling routine.